Bare metal Rust on ESP32
I wrote my firmware using Rust!
What is ESP32?
ESP32 is a low-cost, low-power system-on-a-chip (SoC) microcontroller that is designed for embedded applications, such as Internet of Things (IoT) devices, sensors, and controllers. It was developed by Espressif Systems, a Chinese semiconductor company.
The ESP32 is based on a dual-core 32-bit processor that operates at up to 240 MHz, and it includes built-in Wi-Fi and Bluetooth connectivity, making it an ideal choice for projects that require wireless communication. The chip also includes a variety of peripherals, such as digital and analog inputs and outputs, SPI and I2C interfaces, and pulse width modulation (PWM) outputs.
The ESP32 is highly versatile and can be programmed using a variety of languages, including C++, Python, Rust, and Lua, and it supports development frameworks such as the Arduino IDE and the Espressif IoT Development Framework (ESP-IDF). This makes it easy for developers to get started with the platform and quickly prototype and deploy their projects.
Espressif has a C++ SDK for ESP-IDF, but also working on a Rust one. A new kid on the block is the bare metal variant where the HAL, WiFi, BlueTooth and such are developed in separate repositories and crates.
What is Rust?
Rust is a systems programming language that was first released in 2010 by Mozilla Research. It is designed to be fast, reliable, and safe, with a focus on preventing programming errors that can lead to crashes or security vulnerabilities.
Rust is a compiled language that offers low-level control over system resources, making it ideal for applications that require high performance and low-level access to hardware. At the same time, Rust includes features that help developers write safer and more secure code, such as memory safety guarantees, thread safety, and type safety.
One of the key features of Rust is its ownership model, which allows the language to prevent certain types of bugs that commonly occur in C and C++ programs, such as null pointer dereferences and data races. Rust achieves this by enforcing strict rules about how memory is allocated and accessed, which can be initially challenging for developers who are used to more permissive languages.
Rust also includes modern language features such as pattern matching, closures, and functional programming constructs, which make it a pleasure to work with and can help developers write more concise and expressive code.
Currently, you need a special esp rust toolchain compiler. This is a forked version where Espressif did some patches to the LLVM Xtensa backend.
What is bare metal?
Bare metal programming is often used in embedded systems, where the hardware is designed for a specific application and there is no need for a full operating system. For example, a microcontroller used in a traffic light system or a smart thermostat may be programmed using bare metal techniques.
This is something different as opposed to ESP-IDF, where a lot of stuff is already included like a MQTT client, HTTP server, TCP stack, WiFi etcetera. This might be needed, but it also creates overhead. Bare metal Rust on ESP32 is also sometimes referred to as no_std, which means no standard library. This excludes basic stuff like a Vecorprintln! which allocates heap.
Motivation
Why would we run Rust while we have C++/Arduino?
- Performance: Rust is a compiled language that produces efficient machine code, making it a good choice for systems with limited resources like the ESP32.
- Memory safety: Rust has a unique ownership and borrowing system that ensures memory safety at compile time, which means you are less likely to introduce memory bugs like buffer overflows, null pointer dereferences, and use-after-free errors.
- Expressive type system: Rust has no
null, butOption<T>instead and for error it’s usesResult<T, E>as opposed to throwing exceptions in languages like C or C++. Aswell it has support for discriminated unions (also known as algebraic data types in other languages) which allows you to model more complex models. - Concurrency: Rust has built-in support for concurrency and parallelism, which can be useful for programming microcontrollers like the ESP32 that need to handle multiple tasks simultaneously. A good example is the embassy framework. Tasks get transformed at compile time into state machines that get run cooperatively. It requires no dynamic memory allocation and runs on a single stack, so no per-task stack size tuning is required. It obsoletes the need for a traditional RTOS with kernel context switching, and is faster and smaller than one!
Getting started
To start embedded development, the first step is to figure out what devices you would like to control. After reading the data sheet, you’ll know what interface it’s using and how it should be used. In my case, I’ve used the following components
- LilyGO TTGO T-Beam - LoRa 868MHz - NEO-6M GPS - ESP32
- ASAIR DHT20 Temperature and Humidity Sensor
- ASAIR AGS02MA TVOC Gas Sensor
- 0.91-inch OLED Display 128*32 pixels white
The “LilyGO” is our main board with the ESP32 microcontroller. The ASAIR components are I2C sensors and the display also works on I2C.
I2C
I2C (Inter-Integrated Circuit) is a serial communication protocol used for connecting multiple electronic devices on a circuit board. It allows for two-way communication between devices using only two wires, a clock line (SCL) and a data line (SDA), making it a simple and efficient way to interface between different components in a system.
LilyGO
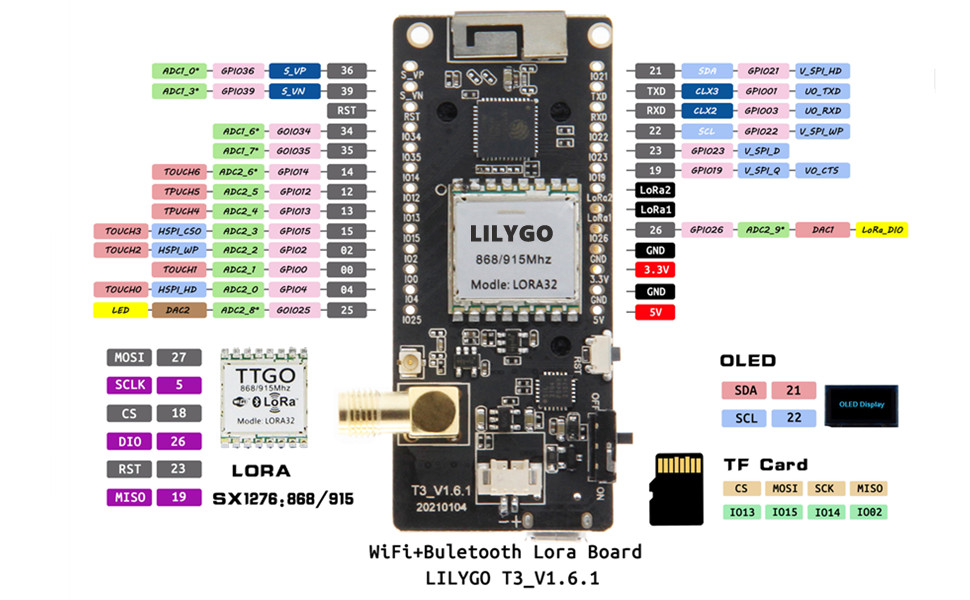
Figuring out what interfaces your ESP32 has, but also your I2C is the first step, let’s start with the ESP32:

For I2C devices there are a few things important
- PWR (usually this is 3.3V)
- GND
- SDA
- SCL
On this board, there is only one way to connect I2C. On pin 21 and 22 there are the respective SDA and SCL pinouts. But we have three devices? I2C is a bus, which allows you to connect multiple devices on the same bus. So that isn’t any problem.
AGS02MA & DHT20 pin outs
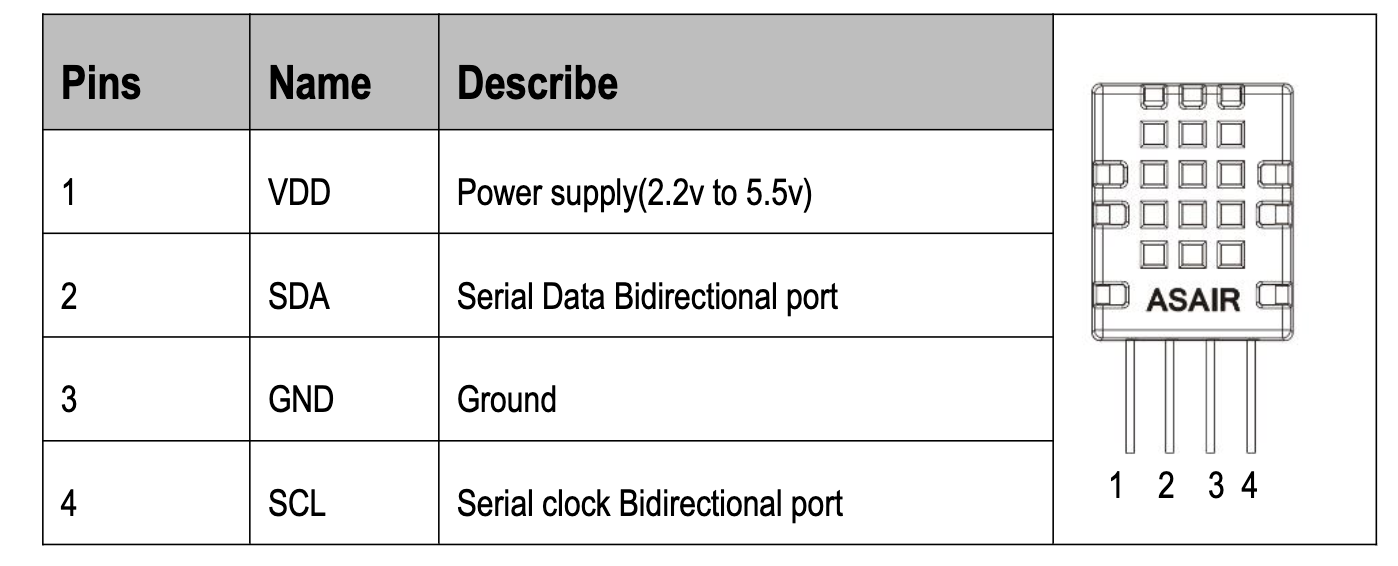
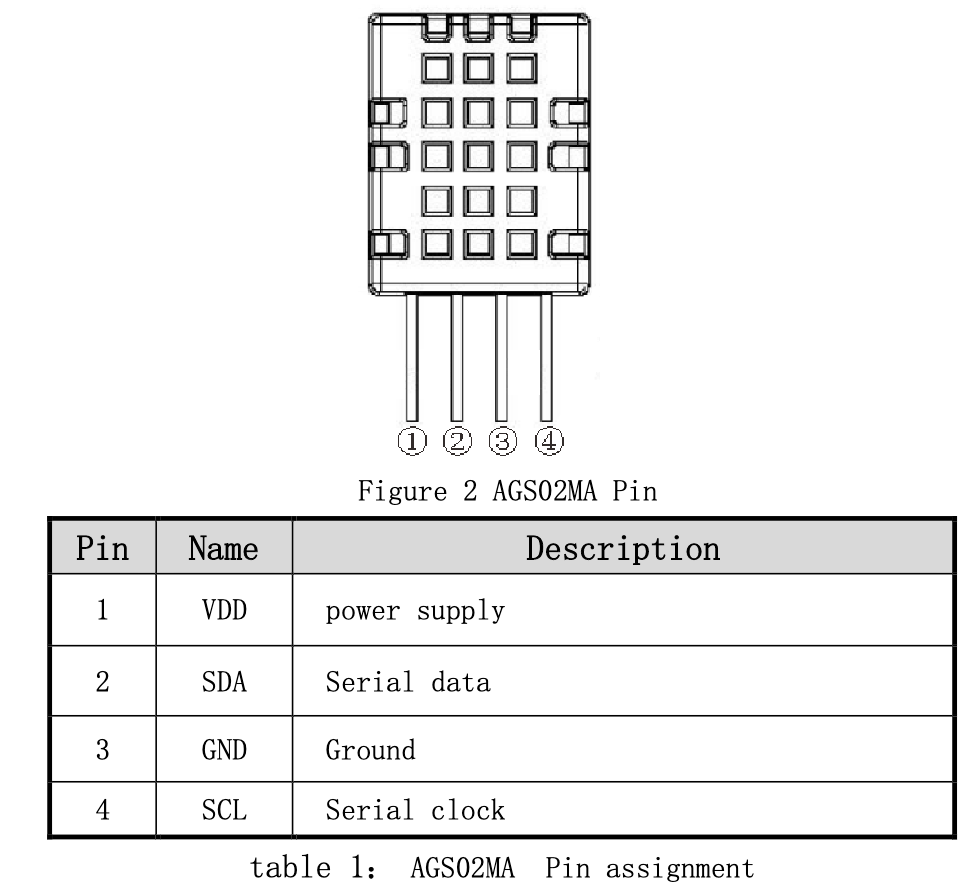
If you look at the datasheet of the AGS02MA and DHT20 it looks like this


Pretty easy! The display is similar as well.
Frequency
Another important detail to figure out is what max frequency all the components can handle. In our case, the OLED display was able to handle a much higher frequency than the sensors. So for that reason, we picked the lowest frequency of our components, 30 khz.
Connecting everything
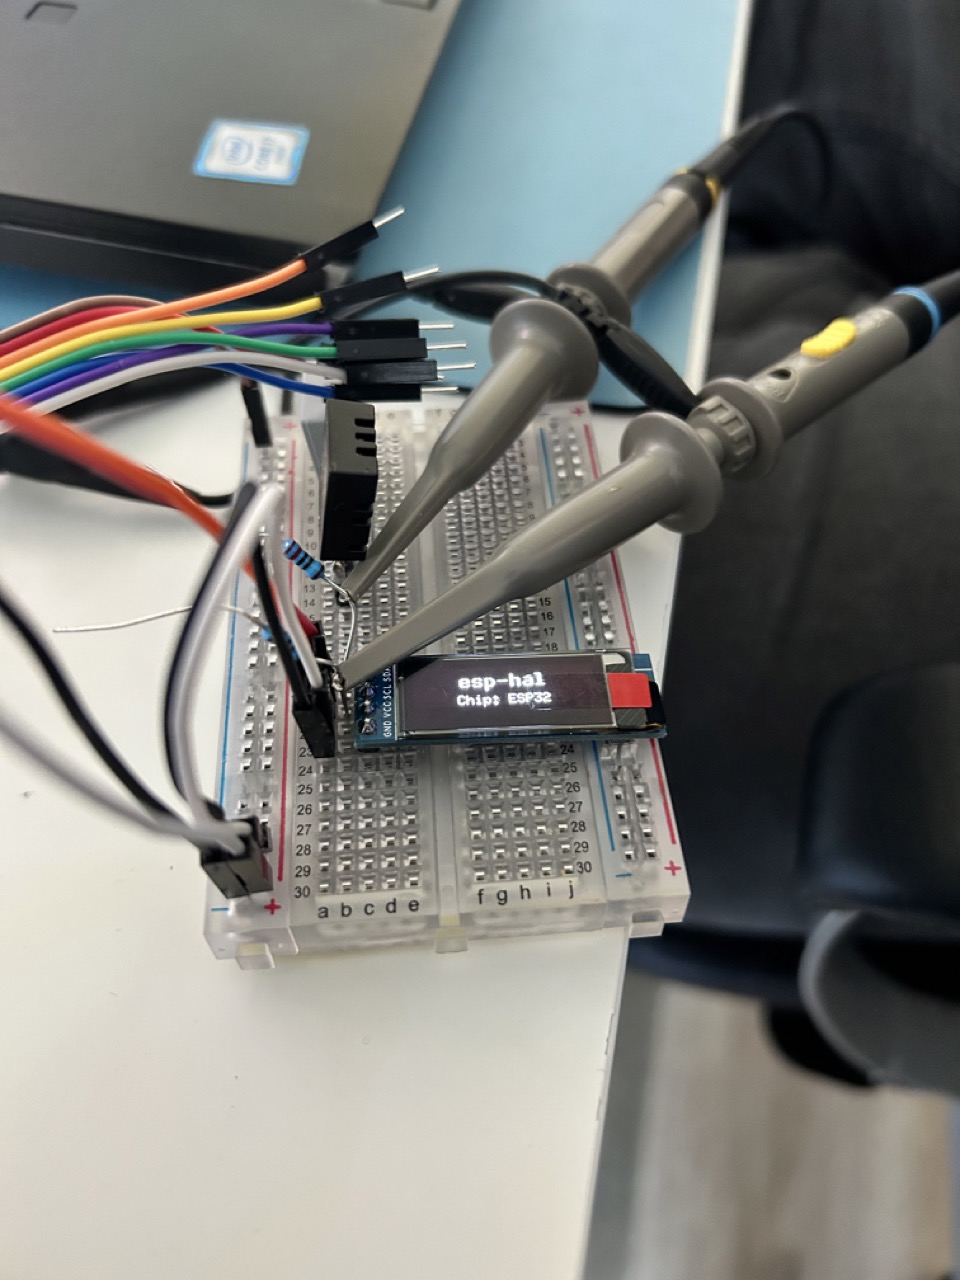
While developing a new PCB it’s nice to breadboard which allows you to use DuPont jumper wires to connect all the components. Here’s a picture of how that looks like.

I’ve also connected an oscilloscope which is a device to debug signals like I2C, PWM, SPI and such.
Firmware development
To start firmware development you need a few things to be setup
- Install espup
cargo install espupand after that get the a rustc version for esp32espup install - Install espflash
cargo install cargo-espflash - Make sure to run
. /Users/{home_dir}/export-esp.shwhen you open a new terminal - Use
cargo espflash flashto flash the device - Use
cargo espflash monitorto see the serial output
The espup is a tool for installing and maintaining the required toolchains for developing applications in Rust for Espressif SoCs. Where espflash is a Serial flasher utility for Espressif devices, based loosely on esptool.py.
Using esp-rs
I’ve used esp-rs which is another option next to the esp-idf. The esp-rs version is the bare metal version which exposes a few different crates like esp-hal and esp-wifi. The first crate is pretty useable, the blocking versions of reading the I2C work and it’s available on crates.io. The async variants of accessing devices asynchronously are still in the works. The esp-wifi is still in active development but will make it possible to use WiFi and Bluetooth.
To bootstrap an I2C device, here’s a little example:
// This contains the peripherals connected to the ESP32, like I2C, SPI, etc.
let peripherals = Peripherals::take();

// more code here .. but omitted this part

let io = IO::new(peripherals.GPIO, peripherals.IO_MUX);

// Create a new peripheral object with the described wiring
// and standard I2C clock speed
let i2c = I2C::new(
    peripherals.I2C0,
    io.pins.gpio21, // remember this being our SDA?
    io.pins.gpio22, // remember this being our SCL?
    30u32.kHz(), // this is thre frequency we've figured out
    &mut system.peripheral_clock_control,
    &clocks,
);
The i2c gives us access to write and read from the I2C bus, however, if you like to use this multiple times rust forbids this due it’s borrow checker.
shared_bus
To solve this we can use the shared_bus create which allows us to use the BusManagerSimple.
In the embedded-hal ecosystem, it is a convention for drivers to “own” the bus peripheral they are operating on. This implies that only one driver can have access to a certain bus. That, of course, poses an issue when multiple devices are connected to a single bus.
shared-bus solves this by giving each driver a bus-proxy to own which internally manages access to the actual bus safely. For a more in-depth introduction of the problem this crate is trying to solve, take a look at the blog post.
I2C drivers
In the Rust ecosystem, the package manager Cargo and its crates are awesome. There are already a lot of crates available which work with I2C devices. This works with ESP32, STM32 and other microcontroller brands. The main reason that these works are that device drivers use the core definitions of I2C and such from embedded-hal (and its respective async variant). For example, to control the OLED display I just dropped in the ssd1306 crate and with a few lines of code, I was able to write something to the display.
Also for sensors, it’s easy to find drivers. However, in some cases, you might want to write your own I2C drivers which is pretty easy.
From esp_hal::ehal::blocking::i2c you’ll need Read and Write to read and write bytes to the I2C bus. Our i2c value from before implements these traits. Another important part of the puzzle of writing drivers is delay. Delay is sometimes as the device needs some time to measure reading and therefore you’ve to wait. This is usually specified in the datasheet of the device.
Testing your I2C can be done in real life of course, but I also came across this blog post. You can use the embedded-hal-mock crate to mock signals read/write on the I2C bus.
Example of a custom AGS02MA device driver written in Rust
For the AGS20MA sensor, there was no crate available with a driver, so I spent a little to write my own.
pub struct Ags02ma<I2C, D> {
    pub i2c: I2C,
    pub delay: D
}

#[derive(Debug)]
pub enum Ags02maError {
    BusWriteError,
    BusReadError,
    CrcError { expected: u8, actual: u8 }
}


impl <I2C, D> Ags02ma<I2C, D> where I2C : Read + Write, D : DelayMs<u16> {
    pub fn read_gas(&mut self) -> Result<u32, Ags02maError> {
        let res = self.execute(1500, &[0x20])?;
        Ok(res * 100)
    }

    pub fn read_tvoc(&mut self) -> Result<u32, Ags02maError> {
        let res = self.execute(1500, &[0x00])?;
        Ok(res & 0xffffff)
    }

    fn execute(&mut self, delay_ms: u16, cmd: &[u8]) -> Result<u32, Ags02maError> {
        // create a fixed buffer of 5 bytes
        let mut buf = [0u8; 5];
        // write to the i2c bus
        self.i2c.write(0x1a, cmd).map_err(|_| Ags02maError::BusWriteError)?;
        // wait for a bit
        self.delay.delay_ms(delay_ms);
        // read from the i2c bus
        self.i2c.read(0x1a, &mut buf).map_err(|_| Ags02maError::BusReadError)?;

        // I've omitted the CRC check here

        let mut temp: u32 = buf[0] as u32;
        temp <<= 8;
        temp |= buf[1] as u32;
        temp <<= 8;
        temp |= buf[2] as u32;
        temp <<= 8;
        temp |= buf[3] as u32;

        return Ok(temp);
    }
}
Conclusion
Bare metal Rust with ESP32 is getting more mature, but it’s to run bare metal firmware that communicates over WiFi with MQTT we need to wait a little bit longer. If you would like to do that, you are better of with the esp-idf crate.
Despite that, after learning all the new concepts (I’m a newb to embedded systems and Rust) it was pretty manageable to get stuff going and the overall DX was pretty nice.
STM32 an alternative system on a chip is much more mature with the embassy eco-system. That would be the next project, keep you posted