Mycelium v2: the edge-central hub
Building the Rust-based hub that onboards over BLE, syncs peripherals, and bridges sensor data to the cloud
In our peripheral hardware post we introduced the battery-powered ESP32 sensor nodes. In firmware and efficiency we covered how those devices sleep, sample, compress, and flush data over BLE. Now it is time for the other half of the edge architecture: edge-central — the always-on hub that sits between your plants and the cloud.
The Mycelium v2 architecture
Mycelium v2 is split into five cooperating pieces:
| Component | Role |
|---|---|
| edge-peripheral | Battery-powered ESP32 sensor node. Collects temperature, humidity, light, soil moisture, and battery level. Advertises over BLE when it has data to flush. |
| edge-central | Always-on hub (we run it on an Orange Pi Zero 2W). Scans for peripherals, syncs time and plant profiles, pulls buffered events, and forwards them to the backend. |
| edge-protocol | Shared Rust crate with protobuf definitions and BLE GATT UUIDs used by both edge binaries. |
| backend | Scala REST API backed by PostgreSQL. Stores stations, measurements, watering events, and plant profiles. Authenticated via Auth0. |
| app | Tauri desktop client for monitoring and managing your plant collection. |
The key architectural bet — explained in the peripheral post — is that peripherals never talk WiFi or TLS directly. Philips Hue, Tado, and many smart-home products use the same pattern: a low-power edge device paired with an always-on hub that handles networking and authentication.
Peripherals are BLE peripherals. The hub is a BLE central during normal operation. During first-time setup the hub briefly becomes a BLE peripheral itself so your phone or laptop can provision WiFi and complete Auth0 pairing.
Hub lifecycle: onboard first, then sync forever
On startup, edge-central checks a local SQLite database for persisted edge state — WiFi credentials and Auth0 tokens. That single row determines which mode the hub is in.
Onboarding (no edge state)
If no state exists, the hub enters onboarding. It advertises as MyceliumHub over BLE, exposes an onboarding GATT service (from the shared edge-onboarding-ble crate), and waits for a companion app to connect. The flow has distinct phases:
- Awaiting WiFi — the companion writes SSID and password to the WiFi characteristic.
- Provisioning WiFi — the hub joins the network (optionally via
wpa_cli/nmcli, or accepts credentials without changing system networking during development). - Awaiting Auth — the hub requests an Auth0 device code and waits for the user to authorize.
- Complete — tokens and WiFi credentials are persisted to SQLite; onboarding BLE shuts down.
Once onboarding finishes, the hub never enters this mode again unless you wipe the database.
Sync loop (edge state present)
With credentials stored, the hub switches roles. It becomes a BLE central that continuously:
- Scans for peripherals advertising the Mycelium station service.
- Connects to each discovered device, runs a sync session (described below), and disconnects.
- Posts measurements and watering events to the backend REST API.
- Repeats.
Plant profiles are loaded separately on a background timer so they are already in memory when a peripheral connects — no round-trip to the backend mid-sync.
Device code flow: Tado, Hue, and YouTube on your TV
Headless devices without a keyboard need a way to sign in. Auth0’s Device Authorization Flow (RFC 8628) is the standard answer: the device displays a short code, you open a URL on a device you already trust, and approve access.
This is the same pattern Philips Hue uses when pairing a bridge, Tado when connecting a thermostat, and the YouTube app on a smart TV when you visit youtube.com/activate.
On the hub we request a device code from Auth0:
pub async fn request_device_code(cfg: &Auth0Config) -> anyhow::Result<DeviceCodeResponse> {
    post_form(
        &format!("https://{}/oauth/device/code", &cfg.domain),
        [
            ("client_id", &cfg.client_id),
            ("scope", &cfg.scope),
            ("audience", &cfg.audience),
        ],
    )
    .await
}
The hub then polls /oauth/token every five seconds until the user completes authorization in a browser. On success we persist the refresh token — subsequent API calls use aliri-tokens to silently refresh access tokens.
Showing the code on an I2C OLED
The Orange Pi has no built-in screen, so we wired a 128×32 SSD1306 OLED over I2C (/dev/i2c-3 on our DietPi image). During onboarding the display shows human-readable status:
Waiting WiFiConnecting / WiFi...Authorizewith the user code on the second line (e.g.ABCD-EFGH)Device / onboarded
The BLE companion receives the same status as protobuf notifications on the onboarding status characteristic, so the phone app and the physical display stay in sync. Implementation uses embedded-graphics and ssd1306 on top of linux-embedded-hal:
fn show_onboarding(&mut self, display: &OnboardingDisplay) -> Result<()> {
    let style = MonoTextStyle::new(&FONT_5X7, BinaryColor::On);
    self.display.clear(BinaryColor::Off)?;
    Text::with_alignment(&display.line1, Point::new(64, 10), style, Alignment::Center)
        .draw(&mut self.display)?;
    if let Some(line2) = &display.line2 {
        Text::with_alignment(line2, Point::new(64, 22), style, Alignment::Center)
            .draw(&mut self.display)?;
    }
    self.display.flush()?;
    Ok(())
}
INFO
Device code vs. PKCE in a browser — the desktop app uses a standard OAuth authorization code flow with PKCE. The hub cannot open a browser, so device code is the right tool. Both flows end up with refresh tokens stored locally; only the user-facing step differs.
For local development without BLE hardware, a local onboarding strategy skips the BLE peripheral entirely and reads WiFi credentials from environment variables while still exercising the Auth0 device code path.
Plant profiles: load separately, ready instantly
Each station can have a plant profile — target ranges for light (lux and μmol), temperature, humidity, soil moisture, and soil EC. The peripheral needs these thresholds locally to decide when conditions are out of range, but fetching them from the backend during every BLE connection would add latency and failure modes.
Instead, edge-central runs a dedicated background task that polls the backend on a configurable interval (default: 60 seconds):
pub async fn run_profile_sync(
    configuration: Configuration,
    store: Arc<CachedPlantProfilePort>,
    interval: Duration,
) {
    loop {
        match default_api::get_profiles(&configuration).await {
            Ok(profiles) => {
                tracing::info!("Fetched {} plant profile(s)", profiles.len());
                store.update(profiles);
            }
            Err(err) => tracing::warn!(?err, "Failed to fetch plant profiles"),
        }
        tokio::time::sleep(interval).await;
    }
}
Profiles are held in an in-memory CachedPlantProfilePort keyed by station MAC address. When a peripheral connects, the hub looks up the profile synchronously and writes it over the STATION_PLANT_PROFILE GATT characteristic — no HTTP call in the hot path.
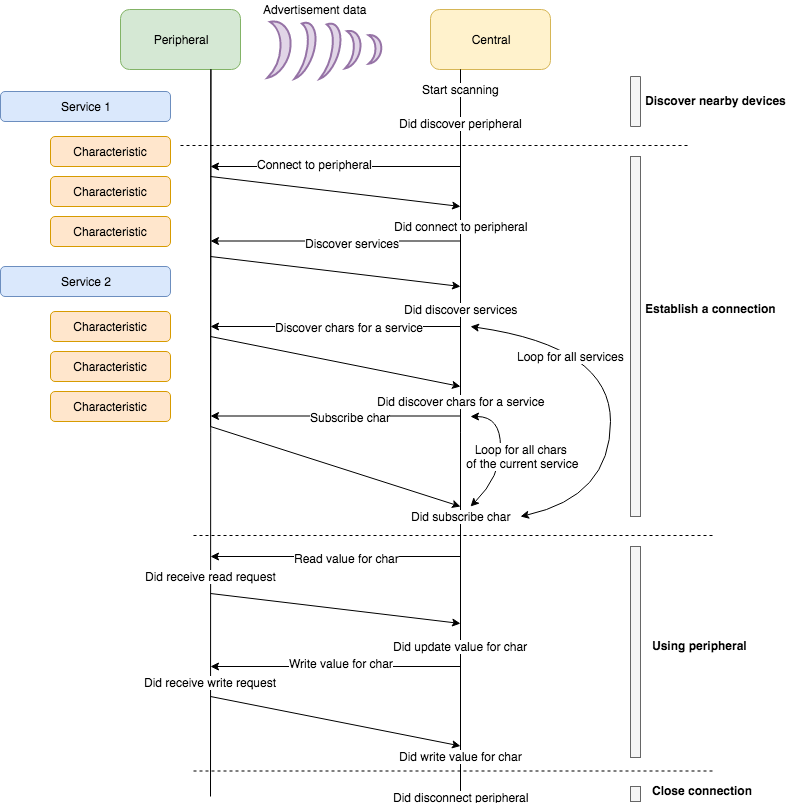
What happens in a synchronization session
A sync session is the atomic unit of work between hub and one peripheral. Here is the sequence, implemented in btleplug:
- Scan — filter advertisements to the Mycelium station service UUID.
- Connect — 10-second timeout; skip devices that do not advertise the local name
Mycelium. - Discover services — locate the station GATT service and its characteristics.
- Read MAC — the peripheral exposes its efuse MAC on a dedicated characteristic (the BLE connection address is not always stable).
- Write current time — push a protobuf
Timestampso the peripheral can align its RTC. Read it back and record clock drift. - Write plant profile — if a cached profile exists for this MAC, encode and write it.
- Read events — decode the protobuf
Eventsmessage containing compressed measurement ranges and watering entries. - Disconnect — release the BLE link so the peripheral can return to deep sleep.
let time_drift = write_current_time(&peripheral, time_char, now).await?;

if let Some(api_profile) = plant_profiles.profile_for_mac(&address) {
    sync_plant_profile(&peripheral, profile_char, &api_profile).await?;
}

let events_data = read_characteristic(&peripheral, events_char).await?;
let events: Events = decode_proto(&events_data)?;
peripheral.disconnect().await?;
After disconnect, the hub registers (or updates) the station in the backend, converts events to check-in payloads, and POSTs them:
let station_id = default_api::add_station(configuration, station_insert).await?;
let checkin_events = events_to_checkin(&m.events)?;
default_api::checkin_station(configuration, &station_id.to_string(), Some(checkin_events)).await?;
Measurement ranges from the peripheral’s timeseries compression become individual Measurement API objects. Watering entries become Watering events with occurred_at and duration_msec.
The scan-connect-sync loop runs continuously. Each iteration produces zero or more PeripheralSyncResult values — one per peripheral found in that scan window.
Sync session metrics: observe locally, display optionally

Every successful sync produces more than cloud data. We extract session-level metrics before the backend call:
- measurement_count — number of compressed measurement ranges transferred
- watering_count — number of watering events
- min_battery — lowest battery reading in the batch
- time_drift_secs — difference between hub clock and peripheral RTC after time sync
- watered_at — most recent watering timestamp, if any
These are stored in a local sync_sessions SQLite table. The schema is intentionally simple — one row per sync, indexed by MAC and station ID:
CREATE TABLE sync_sessions (
    id                INTEGER PRIMARY KEY AUTOINCREMENT,
    synced_at         DATETIME NOT NULL,
    station_id        TEXT NOT NULL,
    mac               TEXT NOT NULL,
    measurement_count INTEGER NOT NULL,
    watering_count    INTEGER NOT NULL,
    min_battery       INTEGER,
    time_drift_secs   INTEGER NOT NULL,
    watered_at        DATETIME
);
A background display loop aggregates sessions per station and rotates through them on the OLED every ten seconds (configurable via APP.STATUS_DISPLAY_PAGE_SECS):
40:f5:20:b7:85:40
M:42 W:5 Bat:72%
Drift:-3s Sync:14:32
When multiple stations have synced, a page indicator (2/3) appears in the corner. If no sync data exists yet, the display shows No sync data. On builds without an I2C display (or when developing on macOS), a no-op status implementation silently discards display updates.
INFO
Clock drift is worth watching. Peripherals rely on the hub for time during flush — large drift means timestamps on buffered measurements may be inaccurate until the next successful sync. Recording drift per session helps catch RTC drift or missed time-sync writes early.
Running on real hardware
We target the Orange Pi Zero 2W running DietPi (AArch64). Cross-compilation uses aarch64-unknown-linux-musl with bluer for BlueZ D-Bus access. The SSD1306 display connects to I2C3 (SDA on PI10, SCL on PI9) at /dev/i2c-3.
Configuration uses environment variables with an APP. prefix:
APP.DATABASE_URL=sqlite://mycelium.db
APP.ONBOARDING_STRATEGY=ble
APP.PERIPHERAL_SYNC_MODE=ble
APP.BACKEND_URL=https://api.example.com/api
APP.AUTH0.DOMAIN=your-tenant.auth0.com
APP.AUTH0.CLIENT_ID=...
APP.AUTH0.SCOPE=offline_access
APP.AUTH0.AUDIENCE=...
APP.PLANT_PROFILES_SYNC_INTERVAL_SECS=60
APP.STATUS_DISPLAY_PAGE_SECS=10
Future work: OTEL ingestion from the hub
Local SQLite metrics and tracing logs are enough for bench debugging, but they do not scale to a fleet of hubs in the field. The next step is forwarding sync session metrics and structured logs to a backend ingestion pipeline via an OpenTelemetry exporter.
Concretely, we plan to:
- Emit OTEL metrics for
sync_session.measurement_count,sync_session.time_drift_secs, andsync_session.durationwith labels forstation_idandmac. - Ship
tracingspans around connect, time-sync, profile-write, and check-in phases so slow BLE operations are visible in Grafana Tempo. - Use OTLP over gRPC to the same observability stack we already run for the Scala backend, giving one place to correlate hub health with API errors.
The hub already wraps the HTTP client with reqwest-tracing; wiring an OTEL SDK alongside it is mostly plumbing. Keeping metrics local-first (SQLite + optional OLED) means the hub remains useful even when the observability backend is unreachable.
Conclusion
Edge-central is the bridge that makes the peripheral architecture work in practice. It handles the parts a battery-powered ESP32 cannot afford to do: WiFi, TLS, OAuth token refresh, and continuous BLE scanning. Onboarding via Auth0 device code — with the code mirrored on a small OLED — gives a familiar smart-home pairing experience. Separating plant profile sync from peripheral sync keeps BLE sessions fast. Local sync session metrics give immediate feedback at the bench without waiting for cloud dashboards.
The full data path is now complete: sensors on the PCB, compression in firmware, BLE to the hub, REST to the backend, charts in the desktop app. From here we can harden observability, tighten onboarding UX in the companion app, and start deploying hubs outside the workshop.
📚 Posts in this series: Mycelium v2
- 1 Introducing Mycelium v2: A smarter way to water and monitor plants
- 2 CI/CD Pipelines: Choosing the Right Tool
- 3 Mycelium v2: building the edge-peripheral device
- 4 Mycelium v2: firmware for the edge-peripheral device
- 5 Mycelium v2: measuring efficiency of edge-peripheral
- 6 Mycelium v2: the edge-central hub (current)
- 7 Mycelium v2: the Scala backend