Mycelium v2: the desktop app
Auth0 login, hub onboarding, plant stations, photo-based watering profiles, and Tado-style metrics in the Tauri desktop app
Sensors and hubs only matter if you can see what they are doing. The Mycelium app is that window: a Tauri desktop client where you sign in, onboard a hub, manage plant stations, attach a photo and watering profile, and watch soil, climate, and watering history in a Tado-like chart view.
This post is about the product surface — what you can do in the app, and how those flows map onto Auth0, the Scala backend, and BLE hub provisioning from edge-central.
Where the app sits
Auth0 ──login──▶ app ──HTTPS──▶ backend
                   │               ▲
                   │ BLE provision │ HTTPS check-in
                   └──▶ hub ───────┘
                          ▲
                          │ BLE
                     peripherals
The app never talks to peripherals. It talks to the backend for stations, measurements, avatars, and plant profiles. Hub onboarding is the exception: Tauri Rust commands scan nearby hubs over BLE, push WiFi credentials, and walk the device through Auth0 authorization so the hub can check in on its own.
Stack
| Layer | Choice |
|---|---|
| Shell | Tauri 2 (Rust + system webview) |
| UI | React + TypeScript + Vite + Tailwind |
| Auth | Auth0 React SDK (PKCE, refresh tokens) |
| Server state | React Query |
| HTTP | OpenAPI-generated Axios client (@backendclient) |
| Charts | Recharts |
| Forms | Formik + Zod |
Hash routing keeps deep links working inside the Tauri webview (/#/plants/:id, /#/hub-add, and so on).
Sign in with Auth0
Unauthenticated users hit a simple gate: sign in, then the rest of the shell loads. The Auth0 provider issues an access token for the API audience; that JWT is passed on every backend call.
if (!isAuthenticated || token == null) {
  return (
    <button onClick={() => loginWithRedirect()}>
      Sign In
    </button>
  );
}

return (
  <AuthenticationContext.Provider value={{ token, user }}>
    {children}
  </AuthenticationContext.Provider>
);
Same identity story as the hub (device code) and the backend (JWKS verification) — different grant types, one user namespace for stations.
Plants overview
The home screen lists your stations (each plant is a station). Open one for metrics and profile, or jump to Add hub when you need to bring a new edge-central online.
Hub onboarding over BLE
Mycelium inverts the usual BLE story once the hub is live: edge-central is the central, ESP32 nodes are peripherals. Onboarding flips that. A virgin hub has no WiFi and no Auth0 tokens, so it cannot reach the cloud. It becomes a BLE peripheral; the Tauri app becomes the temporary central that writes credentials and watches progress.
Both sides share edge-onboarding-ble: protobuf codecs (WifiConfig, OnboardingStatus), fixed 128-bit GATT UUIDs, and traits OnboardingBlePeripheral (hub) / OnboardingBleCentral (app). The hub advertises as MyceliumHub with one onboarding service — a writable WiFi characteristic and a notifiable status characteristic. Payloads are micropb-encoded proto3, not JSON.
Tauri app (BLE central)              edge-central (BLE peripheral)
────────────────────────             ─────────────────────────────
scan service UUID  ───────────────▶  advertise MyceliumHub + GATT
connect            ───────────────▶
write WifiConfig   ───────────────▶  join SSID
watch notifications ◀───────────────  phase + Auth0 URI / errors
Phase machine on the wire: AWAITING_WIFI → PROVISIONING_WIFI → AWAITING_AUTH (carries user_code + verification_uri_complete) → COMPLETE | FAILED. Hub side: accept connection, block on WiFi write, attempt join (retry/re-advertise on failure), request Auth0 device code, notify AWAITING_AUTH, poll tokens, notify COMPLETE, shut down GATT and persist EdgeState. App side: React collects SSID/password → scan_onboarding_devices → provision_hub_device (Rust: connect, write config, stream status, emit onboarding-status into the webview) → user opens the verification URI → UI finishes on Complete.
After that the roles reverse forever: the hub is BLE central to plant peripherals and HTTPS client to the backend; the app only talks HTTP again.
Station detail
Opening a station shows:
- Avatar, name, and location
- Shortcuts to Settings (name, location, description) and Upload image
- A large metrics panel (see below)
- The assigned plant profile in a side column — or a prompt to upload a photo if none is set yet
Settings is deliberately boring: Formik + Zod for the basics, then updateStation against the backend. The interesting personalization lives in the photo → profile flow.
Photo upload and watering profile
Each station can have an avatar. Uploading one does more than decorate the list: the backend classifies the plant and returns candidate plant profiles. You pick one, confirm, and that profile is stored for the station.
The wizard is three steps:
- Upload image — pick a photo of the plant
- Select profile — choose among the classified candidates (name, reference image, care variables)
- Confirm — persist with
setProfileand return to the station view
Those profiles are the same ones edge-central pulls so the hub (and eventually irrigation logic) knows how a plant likes to be watered. The photo is the human-friendly way to attach that domain knowledge to a station.
Metrics in a Tado-like layout
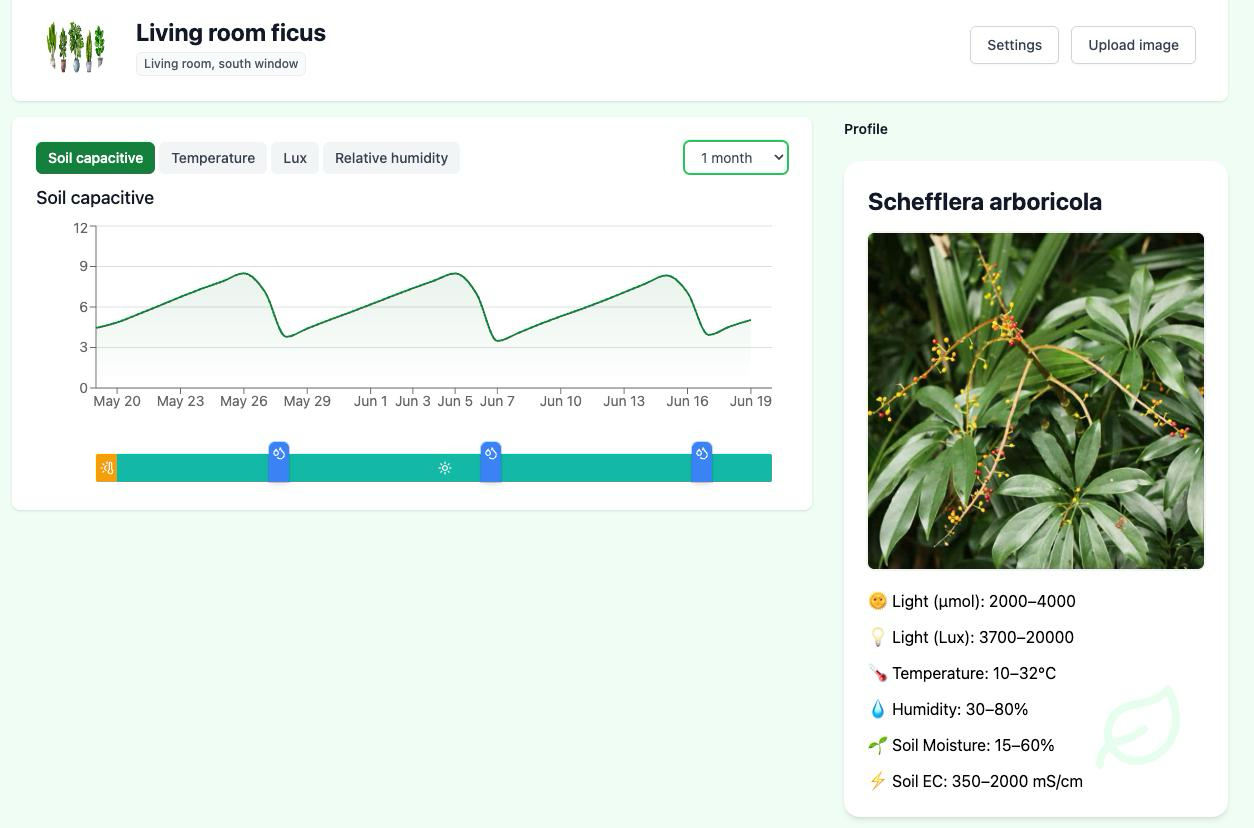
Station history is meant to feel like a climate app, not a spreadsheet. One metric at a time, a clear time range, and a timeline of what happened under the chart.
Metrics (tabbed):
- Soil capacitive (pF)
- Temperature (°C)
- Lux
- Relative humidity (%)
Periods: last 24 hours, and longer ranges from the same control.
The chart is a green area/line series over a shared time axis. Below it, an event timeline overlays watering events and growth-period segments (with icons for conditions such as sun, heat, or rain-related states). Hovering a segment shows duration and detail — the same “glanceable history” pattern people know from apps like Tado.
If there are no measurements yet, the page says so plainly instead of rendering an empty chart. If there is no profile, the side panel nudges you to upload a picture.
Talking to the backend
API access goes through the generated (via the OpenAPI spec) TypeScript client, configured with the Auth0 bearer token and a base URL. When the Scala Tapir API changes, OpenAPI codegen keeps the app honest the same way it does for the Rust hub client.
What you get day to day
In practice the loop is:
- Sign in.
- Add a hub once (WiFi + Auth0 device auth).
- Let peripherals appear as stations; name them and set locations.
- Upload a plant photo and select a watering profile.
- Check the Tado-style charts when you want to know whether soil, light, or humidity are drifting — and see watering events on the same timeline.
That is the desktop app’s job in Mycelium v2: make the edge stack legible, and make plant care configuration something you do with a photo and a few taps rather than a config file.
📚 Posts in this series: Mycelium v2
- 1 Introducing Mycelium v2: A smarter way to water and monitor plants
- 2 CI/CD Pipelines: Choosing the Right Tool
- 3 Mycelium v2: building the edge-peripheral device
- 4 Mycelium v2: firmware for the edge-peripheral device
- 5 Mycelium v2: measuring efficiency of edge-peripheral
- 6 Mycelium v2: the edge-central hub
- 7 Mycelium v2: the Scala backend
- 8 Mycelium v2: the desktop app (current)